How to Retrieve MSSQLSERVER or SQL Server engine running on a set of Servers.
About Me

- Rakesh Kumar
- I am an MCSE in Data Management and Analytics, specializing in MS SQL Server, and an MCP in Azure. With over 19+ years of experience in the IT industry, I bring expertise in data management, Azure Cloud, Data Center Migration, Infrastructure Architecture planning, as well as Virtualization and automation. I have a deep passion for driving innovation through infrastructure automation, particularly using Terraform for efficient provisioning. If you're looking for guidance on automating your infrastructure or have questions about Azure, SQL Server, or cloud migration, feel free to reach out. I often write to capture my own experiences and insights for future reference, but I hope that sharing these experiences through my blog will help others on their journey as well. Thank you for reading!
Timeout occurred while installing Workload Backup extension on the virtual machine.\r\nRetry the operation. If the issue persists, please contact Microsoft support
"Message": "Timeout occurred while installing Workload Backup extension on the virtual machine.\r\nRetry the operation. If the issue persists, please contact Microsoft support.", "target": null, "details": null, "innerError": null
How to delete all resources from all resource group in a specific subscription[dangerous interactive script that delete all resources]
How to delete all resources from all resource group in a specific subscription[dangerous interactive script that delete all resources]
Application security groups and Network security groups in Azure
Application security groups
Application security groups enable you to configure network security as a natural extension of an application's structure, allowing you to group virtual machines and define network security policies based on those groups. You can reuse your security policy at scale without manual maintenance of explicit IP addresses. The platform handles the complexity of explicit IP addresses and multiple rule sets, allowing you to focus on your business logic. To better understand application security groups, consider the following example:
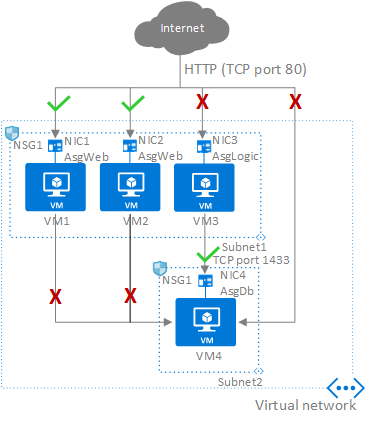
In the previous picture, NIC1 and NIC2 are members of the AsgWeb application security group. NIC3 is a member of the AsgLogic application security group. NIC4 is a member of the AsgDb application security group. Though each network interface in this example is a member of only one application security group, a network interface can be a member of multiple application security groups, up to the Azure limits. None of the network interfaces have an associated network security group. NSG1 is associated to both subnets and contains the following rules:
Allow-HTTP-Inbound-Internet
This rule is needed to allow traffic from the internet to the web servers. Because inbound traffic from the internet is denied by the DenyAllInbound default security rule, no additional rule is needed for the AsgLogic or AsgDb application security groups.
| Priority | Source | Source ports | Destination | Destination ports | Protocol | Access |
|---|---|---|---|---|---|---|
| 100 | Internet | * | AsgWeb | 80 | TCP | Allow |
Deny-Database-All
Because the AllowVNetInBound default security rule allows all communication between resources in the same virtual network, this rule is needed to deny traffic from all resources.
| Priority | Source | Source ports | Destination | Destination ports | Protocol | Access |
|---|---|---|---|---|---|---|
| 120 | * | * | AsgDb | 1433 | All | Deny |
Allow-Database-BusinessLogic
This rule allows traffic from the AsgLogic application security group to the AsgDb application security group. The priority for this rule is higher than the priority for the Deny-Database-All rule. As a result, this rule is processed before the Deny-Database-All rule, so traffic from the AsgLogic application security group is allowed, whereas all other traffic is blocked.
| Priority | Source | Source ports | Destination | Destination ports | Protocol | Access |
|---|---|---|---|---|---|---|
| 110 | AsgLogic | * | AsgDb | 1433 | TCP | Allow |
The rules that specify an application security group as the source or destination are only applied to the network interfaces that are members of the application security group. If the network interface is not a member of an application security group, the rule is not applied to the network interface, even though the network security group is associated to the subnet.
Application security groups have the following constraints:
- There are limits to the number of application security groups you can have in a subscription, as well as other limits related to application security groups. For details, see Azure limits.
- You can specify one application security group as the source and destination in a security rule. You cannot specify multiple application security groups in the source or destination.
- All network interfaces assigned to an application security group have to exist in the same virtual network that the first network interface assigned to the application security group is in. For example, if the first network interface assigned to an application security group named AsgWeb is in the virtual network named VNet1, then all subsequent network interfaces assigned to ASGWeb must exist in VNet1. You cannot add network interfaces from different virtual networks to the same application security group.
- If you specify an application security group as the source and destination in a security rule, the network interfaces in both application security groups must exist in the same virtual network. For example, if AsgLogic contained network interfaces from VNet1, and AsgDb contained network interfaces from VNet2, you could not assign AsgLogic as the source and AsgDb as the destination in a rule. All network interfaces for both the source and destination application security groups need to exist in the same virtual network.
Point to Note:- To minimize the number of security rules you need, and the need to change the rules, plan out the application security groups you need and create rules using service tags or application security groups, rather than individual IP addresses, or ranges of IP addresses, whenever possible.
How traffic is evaluated
You can deploy resources from several Azure services into an Azure virtual network. For a complete list, see Services that can be deployed into a virtual network. You can associate zero, or one, network security group to each virtual network subnet and network interface in a virtual machine. The same network security group can be associated to as many subnets and network interfaces as you choose.
The following picture illustrates different scenarios for how network security groups might be deployed to allow network traffic to and from the internet over TCP port 80:
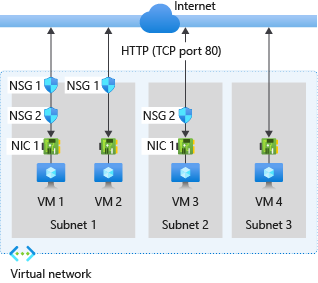
Reference the previous picture, along with the following text, to understand how Azure processes inbound and outbound rules for network security groups:
Inbound traffic
For inbound traffic, Azure processes the rules in a network security group associated to a subnet first, if there is one, and then the rules in a network security group associated to the network interface, if there is one.
- VM1: The security rules in NSG1 are processed, since it is associated to Subnet1 and VM1 is in Subnet1. Unless you've created a rule that allows port 80 inbound, the traffic is denied by the DenyAllInbound default security rule, and never evaluated by NSG2, since NSG2 is associated to the network interface. If NSG1 has a security rule that allows port 80, the traffic is then processed by NSG2. To allow port 80 to the virtual machine, both NSG1 and NSG2 must have a rule that allows port 80 from the internet.
- VM2: The rules in NSG1 are processed because VM2 is also in Subnet1. Since VM2 does not have a network security group associated to its network interface, it receives all traffic allowed through NSG1 or is denied all traffic denied by NSG1. Traffic is either allowed or denied to all resources in the same subnet when a network security group is associated to a subnet.
- VM3: Since there is no network security group associated to Subnet2, traffic is allowed into the subnet and processed by NSG2, because NSG2 is associated to the network interface attached to VM3.
- VM4: Traffic is allowed to VM4, because a network security group isn't associated to Subnet3, or the network interface in the virtual machine. All network traffic is allowed through a subnet and network interface if they don't have a network security group associated to them.
Outbound traffic
For outbound traffic, Azure processes the rules in a network security group associated to a network interface first, if there is one, and then the rules in a network security group associated to the subnet, if there is one.
- VM1: The security rules in NSG2 are processed. Unless you create a security rule that denies port 80 outbound to the internet, the traffic is allowed by the AllowInternetOutbound default security rule in both NSG1 and NSG2. If NSG2 has a security rule that denies port 80, the traffic is denied, and never evaluated by NSG1. To deny port 80 from the virtual machine, either, or both of the network security groups must have a rule that denies port 80 to the internet.
- VM2: All traffic is sent through the network interface to the subnet, since the network interface attached to VM2 does not have a network security group associated to it. The rules in NSG1 are processed.
- VM3: If NSG2 has a security rule that denies port 80, the traffic is denied. If NSG2 has a security rule that allows port 80, then port 80 is allowed outbound to the internet, since a network security group is not associated to Subnet2.
- VM4: All network traffic is allowed from VM4, because a network security group isn't associated to the network interface attached to the virtual machine, or to Subnet3.
You can easily view the aggregate rules applied to a network interface by viewing the effective security rules for a network interface. You can also use the IP flow verify capability in Azure Network Watcher to determine whether the communication is allowed to or from a network interface. IP flow verify tells you whether the communication is allowed or denied, and which network security rule allows or denies the traffic.
Note
Network security groups are associated to subnets or to virtual machines and cloud services deployed the classic deployment model, rather than to network interfaces in the Resource Manager deployment model. To learn more about Azure deployment models, see Understand Azure deployment models.
Tip
Unless you have a specific reason to, we recommended that you associate a network security group to a subnet, or a network interface, but not both. Since rules in a network security group associated to a subnet can conflict with rules in a network security group associated to a network interface, you can have unexpected communication problems that require troubleshooting.
Next read this link very Important:- https://docs.microsoft.com/en-us/azure/virtual-network/tutorial-filter-network-traffic
Next read this link very Important:- https://docs.microsoft.com/en-us/azure/virtual-network/scripts/virtual-network-powershell-sample-multi-tier-application
# Variables for common values
$rgName='MyResourceGroup'
$location='eastus'
# Create user object
$cred = Get-Credential -Message "Enter a username and password for the virtual machine."
# Create a resource group.
New-AzureRmResourceGroup -Name $rgName -Location $location
# Create a virtual network with a front-end subnet and back-end subnet.
$fesubnet = New-AzureRmVirtualNetworkSubnetConfig -Name 'MySubnet-FrontEnd' -AddressPrefix '10.0.1.0/24'
$besubnet = New-AzureRmVirtualNetworkSubnetConfig -Name 'MySubnet-BackEnd' -AddressPrefix '10.0.2.0/24'
$vnet = New-AzureRmVirtualNetwork -ResourceGroupName $rgName -Name 'MyVnet' -AddressPrefix '10.0.0.0/16' `
-Location $location -Subnet $fesubnet, $besubnet
# Create an NSG rule to allow HTTP traffic in from the Internet to the front-end subnet.
$rule1 = New-AzureRmNetworkSecurityRuleConfig -Name 'Allow-HTTP-All' -Description 'Allow HTTP' `
-Access Allow -Protocol Tcp -Direction Inbound -Priority 100 `
-SourceAddressPrefix Internet -SourcePortRange * `
-DestinationAddressPrefix * -DestinationPortRange 80
# Create an NSG rule to allow RDP traffic from the Internet to the front-end subnet.
$rule2 = New-AzureRmNetworkSecurityRuleConfig -Name 'Allow-RDP-All' -Description "Allow RDP" `
-Access Allow -Protocol Tcp -Direction Inbound -Priority 200 `
-SourceAddressPrefix Internet -SourcePortRange * `
-DestinationAddressPrefix * -DestinationPortRange 3389
# Create a network security group for the front-end subnet.
$nsgfe = New-AzureRmNetworkSecurityGroup -ResourceGroupName $RgName -Location $location `
-Name 'MyNsg-FrontEnd' -SecurityRules $rule1,$rule2
# Associate the front-end NSG to the front-end subnet.
Set-AzureRmVirtualNetworkSubnetConfig -VirtualNetwork $vnet -Name 'MySubnet-FrontEnd' `
-AddressPrefix '10.0.1.0/24' -NetworkSecurityGroup $nsgfe
# Create an NSG rule to allow SQL traffic from the front-end subnet to the back-end subnet.
$rule1 = New-AzureRmNetworkSecurityRuleConfig -Name 'Allow-SQL-FrontEnd' -Description "Allow SQL" `
-Access Allow -Protocol Tcp -Direction Inbound -Priority 100 `
-SourceAddressPrefix '10.0.1.0/24' -SourcePortRange * `
-DestinationAddressPrefix * -DestinationPortRange 1433
# Create an NSG rule to allow RDP traffic from the Internet to the back-end subnet.
$rule2 = New-AzureRmNetworkSecurityRuleConfig -Name 'Allow-RDP-All' -Description "Allow RDP" `
-Access Allow -Protocol Tcp -Direction Inbound -Priority 200 `
-SourceAddressPrefix Internet -SourcePortRange * `
-DestinationAddressPrefix * -DestinationPortRange 3389
# Create a network security group for back-end subnet.
$nsgbe = New-AzureRmNetworkSecurityGroup -ResourceGroupName $RgName -Location $location `
-Name "MyNsg-BackEnd" -SecurityRules $rule1,$rule2
# Associate the back-end NSG to the back-end subnet
Set-AzureRmVirtualNetworkSubnetConfig -VirtualNetwork $vnet -Name 'MySubnet-BackEnd' `
-AddressPrefix '10.0.2.0/24' -NetworkSecurityGroup $nsgbe
# Create a public IP address for the web server VM.
$publicipvm1 = New-AzureRmPublicIpAddress -ResourceGroupName $rgName -Name 'MyPublicIp-Web' `
-location $location -AllocationMethod Dynamic
# Create a NIC for the web server VM.
$nicVMweb = New-AzureRmNetworkInterface -ResourceGroupName $rgName -Location $location `
-Name 'MyNic-Web' -PublicIpAddress $publicipvm1 -NetworkSecurityGroup $nsgfe -Subnet $vnet.Subnets[0]
# Create a Web Server VM in the front-end subnet
$vmConfig = New-AzureRmVMConfig -VMName 'MyVm-Web' -VMSize 'Standard_DS2' | `
Set-AzureRmVMOperatingSystem -Windows -ComputerName 'MyVm-Web' -Credential $cred | `
Set-AzureRmVMSourceImage -PublisherName 'MicrosoftWindowsServer' -Offer 'WindowsServer' `
-Skus '2016-Datacenter' -Version latest | Add-AzureRmVMNetworkInterface -Id $nicVMweb.Id
$vmweb = New-AzureRmVM -ResourceGroupName $rgName -Location $location -VM $vmConfig
# Create a public IP address for the SQL VM.
$publicipvm2 = New-AzureRmPublicIpAddress -ResourceGroupName $rgName -Name MyPublicIP-Sql `
-location $location -AllocationMethod Dynamic
# Create a NIC for the SQL VM.
$nicVMsql = New-AzureRmNetworkInterface -ResourceGroupName $rgName -Location $location `
-Name MyNic-Sql -PublicIpAddress $publicipvm2 -NetworkSecurityGroup $nsgbe -Subnet $vnet.Subnets[1]
# Create a SQL VM in the back-end subnet.
$vmConfig = New-AzureRmVMConfig -VMName 'MyVm-Sql' -VMSize 'Standard_DS2' | `
Set-AzureRmVMOperatingSystem -Windows -ComputerName 'MyVm-Sql' -Credential $cred | `
Set-AzureRmVMSourceImage -PublisherName 'MicrosoftSQLServer' -Offer 'SQL2017-WS2016' `
-Skus 'SQLDEV' -Version latest | Add-AzureRmVMNetworkInterface -Id $nicVMsql.Id
$vmsql = New-AzureRmVM -ResourceGroupName $rgName -Location $location -VM $vmConfig
# Create an NSG rule to block all outbound traffic from the back-end subnet to the Internet (must be done after VM creation)
$rule3 = New-AzureRmNetworkSecurityRuleConfig -Name 'Deny-Internet-All' -Description "Deny Internet All" `
-Access Deny -Protocol Tcp -Direction Outbound -Priority 300 `
-SourceAddressPrefix * -SourcePortRange * `
-DestinationAddressPrefix Internet -DestinationPortRange *
# Add NSG rule to Back-end NSG
$nsgbe.SecurityRules.add($rule3)
Set-AzureRmNetworkSecurityGroup -NetworkSecurityGroup $nsgbe
How to run Glenn Berry Scripts from Powershell and store output to the Excel
How to run GlenBerry Script from Powershell and store output to the Excel
what is Shared access Signature - Type of SAS and who control SAS
Shared access
signatures (SAS)
A shared access
signature (SAS) provides you with a way to grant limited access to objects in
your storage account to other clients, without exposing your account key.
A shared access
signature provides delegated access to resources in your storage account.
With a SAS, you can
grant clients access to resources in your storage account, without sharing your
account keys.
This is the key
point of using shared access signatures in your applications--a SAS is a secure
way to share your storage resources without compromising your account keys.
Your storage account key is similar to the root password for
your storage account. Always be careful to protect your account key.
Avoid distributing it to other users, hard-coding it, or
saving it anywhere in plaintext that is accessible to others. Regenerate your
account key using the Azure portal if you believe it may have been compromised
Types of shared
access signatures
You can create two types of shared access signatures:
Service SAS.
The service SAS delegates access
to a resource in just one of the storage services: the Blob, Queue, Table, or
File service.
See Constructing a Service SAS
and Service SAS Examples for in-depth information about constructing the
service SAS token.
Account SAS.
The account SAS delegates access
to resources in one or more of the storage services.
All of the operations available
via a service SAS are also available via an account SAS.
Additionally, with the account
SAS, you can delegate access to operations that apply to a given service, such
as Get/Set Service Properties and Get Service Stats.
You can also delegate access to read, write,
and delete operations on blob containers, tables, queues, and file shares that
are not permitted with a service SAS.
See Constructing an Account SAS for in-depth
information about constructing the account SAS token.
Service SAS URI
example
Here is an example of
a service SAS URI that provides read and write permissions to a blob. The table
breaks down each part of the URI to understand how it contributes to the SAS:
Name
|
SAS portion
|
Description
|
Blob URI
|
https://myaccount.blob.core.windows.net/sascontainer/sasblob.txt
|
The address of the
blob. Note that using HTTPS is highly recommended.
|
Storage services
version
|
sv=2015-04-05
|
For storage
services version 2012-02-12 and later, this parameter indicates the version
to use.
|
Start time
|
st=2015-04-29T22%3A18%3A26Z
|
Specified in UTC
time. If you want the SAS to be valid immediately, omit the start time.
|
Expiry time
|
se=2015-04-30T02%3A23%3A26Z
|
Specified in UTC
time.
|
Resource
|
The resource is a
blob.
|
|
Permissions
|
sp=rw
|
The permissions
granted by the SAS include Read (r) and Write (w).
|
IP range
|
sip=168.1.5.60-168.1.5.70
|
The range of IP
addresses from which a request will be accepted.
|
Protocol
|
spr=https
|
Only requests using
HTTPS are permitted.
|
Signature
|
sig=Z%2FRHIX5Xcg0Mq2rqI3OlWTjEg2tYkboXr1P9ZUXDtkk%3D
|
Used to authorize
access to the blob. The signature is an HMAC computed over a string-to-sign
and key using the SHA256 algorithm, and then encoded using Base64 encoding.
|
Account SAS URI example
Here is an example of an account SAS that uses the same common
parameters on the token. Since these parameters are described above, they are
not described here. Only the parameters that are specific to account SAS are
described in the table below.
ame
|
SAS portion
|
Description
|
Resource URI
|
https://myaccount.blob.core.windows.net/?restype=service&comp=properties
|
The Blob service
endpoint, with parameters for getting service properties (when called with
GET) or setting service properties (when called with SET).
|
Services
|
ss=bf
|
The SAS applies to
the Blob and File services
|
Resource types
|
srt=s
|
The SAS applies to
service-level operations.
|
Permissions
|
sp=rw
|
The permissions
grant access to read and write operations.
|
Controlling
a SAS with a stored access policy
A shared access signature can take one of two forms:
·
Ad hoc
SAS: When you create an ad hoc SAS, the start time, expiry time,
and permissions for the SAS are all specified in the SAS URI (or implied, in
the case where start time is omitted). This type of SAS can be created as an
account SAS or a service SAS.
·
SAS with
stored access policy: A stored access policy is defined on a
resource container--a blob container, table, queue, or file share--and can be
used to manage constraints for one or more shared access signatures. When you
associate a SAS with a stored access policy, the SAS inherits the
constraints--the start time, expiry time, and permissions--defined for the
stored access policy.
Note
Currently,
an account SAS must be an ad hoc SAS. Stored access policies are not yet
supported for account SAS.
The difference between the two forms is important for one key
scenario: revocation. Because a SAS URI is a URL, anyone that obtains the SAS
can use it, regardless of who originally created it. If a SAS is published
publicly, it can be used by anyone in the world. A SAS grants access to
resources to anyone possessing it until one of four things happens:
1.
The expiry time specified on the SAS is reached.
2.
The expiry time specified on the stored access policy referenced
by the SAS is reached (if a stored access policy is referenced, and if it
specifies an expiry time). This can occur either because the interval elapses,
or because you've modified the stored access policy with an expiry time in the
past, which is one way to revoke the SAS.
3.
The stored access policy referenced by the SAS is deleted, which
is another way to revoke the SAS. Note that if you recreate the stored access
policy with exactly the same name, all existing SAS tokens will again be valid
according to the permissions associated with that stored access policy (assuming
that the expiry time on the SAS has not passed). If you are intending to revoke
the SAS, be sure to use a different name if you recreate the access policy with
an expiry time in the future.
4.
The account key that was used to create the SAS is regenerated.
Regenerating an account key will cause all application components using that
key to fail to authorize until they're updated to use either the other valid
account key or the newly regenerated account key.
Subscribe to:
Posts (Atom)