About Me

My photo
I am an MCSE in Data Management and Analytics, specializing in MS SQL Server, and an MCP in Azure. With over 19+ years of experience in the IT industry, I bring expertise in data management, Azure Cloud, Data Center Migration, Infrastructure Architecture planning, as well as Virtualization and automation. I have a deep passion for driving innovation through infrastructure automation, particularly using Terraform for efficient provisioning. If you're looking for guidance on automating your infrastructure or have questions about Azure, SQL Server, or cloud migration, feel free to reach out. I often write to capture my own experiences and insights for future reference, but I hope that sharing these experiences through my blog will help others on their journey as well. Thank you for reading!

Create a AKS Cluster and execute the image which is stored in ACR using AKS cluster public IP.

                                                    KUBERNETES OVERVIEW

 To deploy a single containerized application, or you manage a handful of them, it's simple enough to do with existing tools.
 When we are developing dozens of applications that are made of multiple containers each,
 we need container orchestration. 
 Container orchestration is defined as a system for automatically deploying, managing and scaling containerized applications on a group of servers.
 In short, orchestration is to containers, but cluster management is to virtual machines. 
 When instructed to do so, a container orchestrator finds a suitable host to run your container image.
 This is often called scheduling. 
 Furthermore, container orchestrator enables service discovery, which allows containers to discover each other automatically, even as they move between hosts.
 An orchestrator also provides load balancing for safe containers.
 The container orchestrator make sure that your applications are highly available.
 It monitors the health of your containers.
 In case of failures, an orchestrator automatically re provisions the containers, and if necessary, schedules them into another host.
 An orchestrator can also provide resiliency against host failures by ensuring anti affinity, meaning that the containers are scheduled into separate hosts.
 Finally, an orchestrator adds and removes instances of your containers to keep up with demand. 
 It can even take advantage of the scaling rules when upgrading your application, in order to avoid any downtime whatsoever.
 Kubernetes is a popular open source container orchestrator system. 
 In Kubernetes, the logical grouping for one or more containers is called a pod,
 similarly to the collective noun of whales, a group of whales is called a pod.
 This is of course reference to the popular Moby container runtime. 
 Containers in a pod share storage, network and other specifications. 
 They can for example, connect to each other through local host, and they share IP addresses and pods.
 Typically, application front end and back ends are separated into their own pods.
 This allows for independent scaling and upgrading.
 A Kubernetes service is a set of pods that is exposed as a network service, such as a load balancer or a static IP address.
 When pods are exposed as a service, they can be discovered by other applications in the Kubernetes cluster.
 Services can also be exposed outside of the cluster to the internet.
 Kubernetes pods are hosted in nodes.
 Nodes are servers that have container runtime and Kubernetes node components installed.
 Nodes communicate to the Kubernetes control plane.
 The control plane provides the orchestration features, such as scheduling.

 Kubernetes Feature
 ====================

 Kubernetes provides integration with local file storage and public cloud providers. 
 This means that they can mount native cloud storage services as volumes for our container applications running in Kubernetes. 
 The same applies with secrets, 
 Kubernetes stores and manage the secrets outside of the pod definition or the container image.
 When pods are scheduled to nodes, they request access to the specific secrets at runtime. 
 Kubernetes lets you scale your application programmatically through a GUI, or automatically based on CPU utilization, or auto metrics.
 This is defined in the horizontal pod auto scaler.
 And finally, Kubernetes lets you automatically roll out applications or configuration changes, while monitoring the health and availability of your application. 
 You can start by introducing the new updates only to a handful of pods, and if everything looks good, that Kubernetes roll the changes out to the rest.
 If something goes wrong, the changes can even be rolled back to the last known good state, automatically.


Azure Kubernetes Service or AKS, is a managed cloud service that simplifies building and managing applications with Kubernetes.

But what does a manage service mean? In the case of AKS, it means that Microsoft is taking care of some of the maintenance tasks related to the operation of the Kubernetes Cluster.

A Kubernetes cluster is made of a control plane and nodes.


In Azure Kubernetes Service, the Azure platform manages the control plane for us.

The Kubernetes nodes are provisioned automatically, but still ultimately our responsibility.

When you create an AKS cluster, Microsoft automatically creates and configures the control plane for you.

The control plane provides core Kubernetes features such as Pod scheduling, and service discovery.

The control plane is visible to us as an Azure Kubernetes Service resource. We can interact with the control plane using Kubernetes APIs, kubectl , kub or the kubernetes Dashboard, but we cannot work with the control plane directly.


Microsoft is responsible for maintaining the control plane, and keeping it highly available.

If you want to make changes to our control plane, such as upgrade our kubernates cluster to a new major version, we can use the Azure Portal, or the  that AKS has commands in Azure CLI.

az aks upgrade --kubernetes-version 1.16.9 --name rakAKSCluster --resource-group RGP-USE-PLH-NP


Your application containers run in kubernetes nodes.

In AKS, nodes are our Azure virtual machines and created by the control plane.

For example, if you want to add a new node to your Kubernetes cluster, you will simply use the CLI at AKS scale command.

The node virtual machine as resources will be created with the Ubuntu Linux operating system, and more will be contained runtime installed.

Additionally, the kubelet agent and kube proxy are installed and configured.


The AKS resource creates an amenities to Azure virtual machine, Azure disk, and Azure virtual network resources for us. They are created into a managed cluster resource group. The resource group is automatically created and named with the MC prefix.


Once the nodes are created, the operating system of the virtual machines stays our responsibility.

Security updates are automatically applied to Linux Nodes, but AKS does not automatically reboot to nodes, to complete the update process.

Node reboots remain our responsibility.

The AKS control plane is provided as a free service. Nodes, discs, and networking resources are all our responsibility, and incur regular costs.

Microsoft Service Level Agreements, guarantee availability of our nodes.

This means that Microsoft reimburses us if they do not meet the uptime guarantees.

But as there is no cost involved with the control plane, there has not been an official SLA, for kubernetes API server endpoints, so the control plane. Instead, Microsoft has published a service level objective of two and 1/2 lines or 99.5%.

 Microsoft has just announced an optional feature for uptime SLA for the control plane two.

With this paid feature, you can get an uptime SLA, with a guarantee of three and a half lines, or 99.95%, with a cluster that uses availability zones.

1.Create a service principal
2.Get the ACR resource ID
3.Create a role assignment
4.Create a aks cluster with name rakAKSCluster and associate appId and Password.


To allow an AKS cluster to interact with other Azure resources such as the Azure Container Registry which we created in a previous blog
an Azure Active Directory (ad) service principal is used. 

To create the service principal:
az ad sp create-for-rbac --skip-assignment

Execute this command:-

1.azuser@ubuntutest2020:~$ az ad sp create-for-rbac --skip-assignment
  or
az ad sp create-for-rbac --name rakeshServicePrincipal --skip-assignment

 its output would be:-

{
  "appId": "db45168e-XXXX-4701-a2ed-ae4480db03b1",
  "displayName": "azure-cli-2020-08-02-06-44-03",
  "name": "http://azure-cli-2020-08-02-06-44-03",
  "password": "mYezngEP_XXXXXXX_7aMGarpH2wxUFf9",
  "tenant": "8896b7ee-CCCCC-4488-8fe2-05635ccbcf01"
}

Make a note of the appId and password, you will need these. Better yet, save this credential somewhere secure.

2.Get the ACR resource ID:

az acr show --resource-group RGP-USE-PLH-NP --name rakakcourse28 --query "id" --output tsv

output:-
/subscriptions/9239f519-8504-XXXX-ae6f-c84d53ba3714/resourceGroups/RGP-USE-PLH-NP/providers/Microsoft.ContainerRegistry/registries/rakakcourse28


3.Create a role assignment:
az role assignment create --assignee <appId> --scope <acrId> --role Reader


Example:-

az role assignment create --assignee db45168e-XXXX-4701-a2ed-ae4480db03b1 --scope /subscriptions/9239f519-XXXX-4e92-ae6f-c84d53ba3714/resourceGroups/RGP-USE-PLH-NP/providers/Microsoft.ContainerRegistry/registries/rakakcourse28/  --role Reader


4.Create a aks cluster with name rakAKSCluster and associate appId and Password.

 
azuser@ubuntutest2020:~$ az aks create \
   --resource-group RGP-USE-PLH-NP \
   --name rakAKSCluster \
   --node-count 1 \
   --vm-set-type VirtualMachineScaleSets \
   --load-balancer-sku standard \
   --enable-cluster-autoscaler \
   --min-count 1 \
   --max-count 3 \
  --generate-ssh-keys \
   --service-principal db45168e-XXXXX-4701-a2ed-ae4480db03b1 --client-secret mYezngEP_XXXX_7aMGarpH2wxUFf9

This will create a cluster (which may take 5-10 minutes).   
   output:-

SSH key files '/root/.ssh/id_rsa' and '/root/.ssh/id_rsa.pub' have been generated under ~/.ssh to allow SSH access to the VM. If using machines without permanent storage like Azure Cloud Shell without an attached file share, back up your keys to a safe location

-->To display the metadata of the AKS cluster that you've created, use the following command. Copy the principalIdclientIdsubscriptionId, and nodeResourceGroup for later use. If the ASK cluster was not created with managed identities enabled, the principalId and clientId will be null.

verification:-  az aks show --name rakAKSCluster -g RGP-USE-PLH-NP

The behavior of this command has been altered by the following extension: aks-preview

5.  Install kubectl to connect to the kubernetes environment via the Kubernetes CLI.

Once done, we can connect to the kubernetes environment via the Kubernetes CLI. 
If you are using the Azure Cloud Shell, the kubernetes client (kubectl) is already installed. 
You can also install locally if you haven't previously installed a version of kubectl:

-->az aks install-cli
or

snap install kubectl --classic

kubectl version --client

output:-
Downloading client to "/usr/local/bin/kubectl" from "https://storage.googleapis.com/kubernetes-release/release/v1.19.2/bin/linux/amd64/kubectl"
Please ensure that /usr/local/bin is in your search PATH, so the `kubectl` command can be found.
Downloading client to "/tmp/tmpzcr2zebh/kubelogin.zip" from "https://github.com/Azure/kubelogin/releases/download/v0.0.6/kubelogin.zip"
Please ensure that /usr/local/bin is in your search PATH, so the `kubelogin` command can be found.


6.Get access credentials for a managed Kubernetes cluster

azuser@ubuntutest2020:~$ az aks get-credentials --resource-group RGP-USE-PLH-NP --name rakAKSCluster --admin

The behavior of this command has been altered by the following extension: aks-preview
Merged "rakAKSCluster-admin" as current context in /home/azuser/.kube/config
~~~~~~~~~~~~~~~~~~~~~~~~~~~~~~~~~~~~~~~~~~~~~~~~~~~~~~~~~~~~~~~~


azuser@ubuntutest2020:~$ kubectl version
output

Client Version: version.Info{Major:"1", Minor:"18", GitVersion:"v1.18.6", GitCommit:"dff82dc0de47299ab66c83c626e08b245ab19037", GitTreeState:"clean", BuildDate:"2020-07-15T16:58:53Z", GoVersion:"go1.13.9", Compiler:"gc", Platform:"linux/amd64"}
Server Version: version.Info{Major:"1", Minor:"16", GitVersion:"v1.16.10", GitCommit:"89d8075525967c7a619641fabcb267358d28bf08", GitTreeState:"clean", BuildDate:"2020-06-23T02:52:37Z", GoVersion:"go1.13.9", Compiler:"gc", Platform:"linux/amd64"}

Check your connection and that the kubernetes cli is working with:
azuser@ubuntutest2020:~$ kubectl get nodes

root@ubuntuserver01:/home/admina# kubectl get nodes
NAME                                STATUS   ROLES   AGE   VERSION
aks-nodepool1-32633493-vmss000000   Ready    agent   12m   v1.17.9


azuser@ubuntutest2020:~$ az acr list --resource-group RGP-USE-PLH-NP --query "[].{acrLoginServer:loginServer}" --output tsv

rakakcourse28.azurecr.io

azuser@ubuntutest2020:~$ kubectl version
Client Version: version.Info{Major:"1", Minor:"18", GitVersion:"v1.18.6", GitCommit:"dff82dc0de47299ab66c83c626e08b245ab19037", GitTreeState:"clean", BuildDate:"2020-07-15T16:58:53Z", GoVersion:"go1.13.9", Compiler:"gc", Platform:"linux/amd64"}

Server Version: version.Info{Major:"1", Minor:"17", GitVersion:"v1.17.7", GitCommit:"5737fe2e0b8e92698351a853b0d07f9c39b96736", GitTreeState:"clean", BuildDate:"2020-06-24T19:54:11Z", GoVersion:"go1.13.6", Compiler:"gc", Platform:"linux/amd64"}

This will tell you both the local client, and the configured kubernetes service version, 
make sure the client is at least the same if not newer than the server.

8. Create  a hostname.yml file and update the image which we have stored in Azure container registry

  download the file from here 
   
azuser@ubuntutest2020:~$ cat hostname.yml
apiVersion: apps/v1
kind: Deployment
metadata:
  name: hostname-v1
spec:
  replicas: 1
  selector:
    matchLabels:
      app: hostname
  strategy:
    rollingUpdate:
      maxSurge: 1
      maxUnavailable: 1
    type: RollingUpdate
  template:
    metadata:
      labels:
        app: hostname
        version: v1
    spec:
      containers:
      - image: rakakcourse28.azurecr.io/hostname:v1
        imagePullPolicy: Always
        name: hostname
        resources: {}
      restartPolicy: Always
---
apiVersion: v1
kind: Service
metadata:
  labels:
    app: hostname
  name: hostname
spec:
  ports:
  - port: 80
    protocol: TCP
    targetPort: 80
  selector:
    app: hostname
  sessionAffinity: None
  type: LoadBalancer


azuser@ubuntutest2020:~$ vi hostname.yml

9. Apply the yml file

azuser@ubuntutest2020:~$ kubectl apply -f hostname.yml
deployment.apps/hostname-v1 created
service/hostname unchanged

10. Get the external IP of load balance of  AKS cluster

azuser@ubuntutest2020:~$ kubectl get svc hostname -w
NAME       TYPE           CLUSTER-IP    EXTERNAL-IP    PORT(S)        AGE
hostname   LoadBalancer   10.0.180.98   52.191.86.89   80:30182/TCP   23m

azuser@ubuntutest2020:~$ kubectl get svc hostname -w
NAME       TYPE           CLUSTER-IP    EXTERNAL-IP    PORT(S)        AGE
hostname   LoadBalancer   10.0.180.98   52.191.86.89   80:30182/TCP   33m

11. execute the file locally  

azuser@ubuntutest2020:~$ curl http://52.191.86.89
<HTML>
<HEAD>
<TITLE>This page is on hostname-v1-5d7984db8b-qnflf and is version v1</TITLE>
</HEAD><BODY>
<H1>THIS IS HOST hostname-v1-5d7984db8b-qnflf</H1>
<H2>And we're running version: v1</H2>
</BODY>
</HTML>


root@ubuntuserver01:/home/admina# kubectl get pods
NAME                           READY   STATUS    RESTARTS   AGE
hostname-v1-5d7984db8b-b4fxg   1/1     Running   0          11m


Configure and run the Azure Key Vault provider for the Secrets Store CSI driver on Kubernetes


To install the Secrets Store CSI driver, you first need to install Helm.
With the Secrets Store CSI driver interface, you can get the secrets that are stored in your Azure key vault instance and then 
use the driver interface to mount the secret contents into Kubernetes pods.

 1. Install Helm
 2. Install Secrets Store CSI driver


Install Helm and the Secrets Store CSI driver

 Install helm
https://helm.sh/docs/intro/install/

From Apt (Debian/Ubuntu)

curl https://baltocdn.com/helm/signing.asc | sudo apt-key add -
sudo apt-get install apt-transport-https --yes

echo "deb https://baltocdn.com/helm/stable/debian/ all main" | sudo tee /etc/apt/sources.list.d/helm-stable-debian.list

sudo apt-get update

sudo apt-get install helm

Install the Secrets Store CSI driver and the Azure Key Vault provider for the driver:


--> helm repo add csi-secrets-store-provider-azure https://raw.githubusercontent.com/Azure/secrets-store-csi-driver-provider-azure/master/charts

-->helm install csi-secrets-store-provider-azure/csi-secrets-store-provider-azure --generate-name

Create an Azure key vault and set your secrets


az keyvault create --name "rakaks-Vault2" --resource-group "RGP-USE-PLH-NP" --location eastus

az keyvault secret set --vault-name "rakaks-Vault2" --name "ExamplePassword" --value "hVFkk965BuUv"

az keyvault secret list --vault-name "rakaks-Vault2"

Assign your service principal to your existing key vault. 

Here --assignee is AZURE_CLIENT_ID parameter is the appId that you copied after you created your service principal.


 -->az role assignment create --role Reader --assignee '6a9171ad-e645-41e0-91d3-404afe478555'   --scope '/subscriptions/9239f519-8504-4e92-ae6f-c84d53ba3714/resourceGroups/RGP-USE-PLH-NP/providers/Microsoft.KeyVault/vaults/rakaks-Vault2'

output:- 
The output of the command is shown in the following image:

{
  "canDelegate": null,
  "id": "/subscriptions/9239f519-8504-4e92-ae6f-c84d53ba3714/resourceGroups/RGP-USE-PLH-NP/providers/Microsoft.KeyVault/vaults/rakaks-Vault2/providers/Microsoft.Authorization/roleAssignments/0873a91f-5d33-4a9a-9141-14fd5a0ec689",
  "name": "0873a91f-5d33-4a9a-9141-14fd5a0ec689",
  "principalId": "3c29c6bc-123e-42dc-b712-a12b05c513c4",
  "principalType": "ServicePrincipal",
  "resourceGroup": "RGP-USE-PLH-NP",
  "roleDefinitionId": "/subscriptions/9239f519-8504-4e92-ae6f-c84d53ba3714/providers/Microsoft.Authorization/roleDefinitions/acdd72a7-3385-48ef-bd42-f606fba81ae7",
  "scope": "/subscriptions/9239f519-8504-4e92-ae6f-c84d53ba3714/resourceGroups/RGP-USE-PLH-NP/providers/Microsoft.KeyVault/vaults/rakaks-Vault2",
  "type": "Microsoft.Authorization/roleAssignments"
}

Grant the service principal permissions to get secrets:


az keyvault set-policy -n 'rakaks-Vault2' --secret-permissions get --spn '6a9171ad-e645-41e0-91d3-404afe478555'

The output of the command is shown in the following image:


You've now configured your service principal with permissions to read secrets from your key vault. The $AZURE_CLIENT_SECRET is the password of your service principal.

Next, Add your service principal credentials as a Kubernetes secret that's accessible by the Secrets Store CSI driver:


root@ubuntuserver01:/home/admina# kubectl create secret generic secrets-store-creds --from-literal clientid=6a9171ad-e645-41e0-91d3-404afe478555 --from-literal clientsecret=$AZURE_CLIENT_SECRET

example:-

root@ubuntuserver01:/home/admina# kubectl create secret generic secrets-store-creds --from-literal clientid=6a9171ad-e645-41e0-91d3-404afe478555 --from-literal clientsecret=kM9ZUHT1Y.a3kdXXXXt-ouxdFZtQ09

secret/secrets-store-creds created
root@ubuntuserver01:/home/admina#


create a file named secretProviderClass.yaml


apiVersion: secrets-store.csi.x-k8s.io/v1alpha1 kind: SecretProviderClass metadata: name: rakaksvault2 spec: provider: azure parameters: usePodIdentity: "false" # [REQUIRED] Set to "true" if using managed identities useVMManagedIdentity: "false" # [OPTIONAL] if not provided, will default to "false" userAssignedIdentityID: "6a9171ad-e645-41e0-91d3-404afe478555" # [REQUIRED] If you're using a service principal, use the client id to specify which user-assigned managed identity to use. If you're using a user-assigned identity as the VM's managed identity, specify the identity's client id. If the value is empty, it defaults to use the system-assigned identity on the VM # az ad sp show --id http://contosoServicePrincipal --query appId -o tsv # the preceding command will return the client ID of your service principal keyvaultName: "rakaks-Vault2" # [REQUIRED] the name of the key vault # az keyvault show --name contosoKeyVault5 # the preceding command will display the key vault metadata, which includes the subscription ID, resource group name, key vault cloudName: "" # [OPTIONAL for Azure] if not provided, Azure environment will default to AzurePublicCloud objects: | array: - | objectName: "ExamplePassword" # [REQUIRED] object name # az keyvault secret list --vault-name "contosoKeyVault5" # the above command will display a list of secret names from your key vault objectType: secret # [REQUIRED] object types: secret, key, or cert objectVersion: "" # [OPTIONAL] object versions, default to latest if empty resourceGroup: "RGP-USE-PLH-NP" # [REQUIRED] the resource group name of the key vault subscriptionId: "9239f519-8504-4e92-ae6f-c84d53ba3714" # [REQUIRED] the subscription ID of the key vault tenantId: "8896b7ee-113f-4488-8fe2-05635ccbcf01" # [REQUIRED] the tenant ID of the key vault


and copy the file to \home\admina folder in ubuntu server so that we can run the command

Deploy your pod with mounted secrets from your key vault

To configure your SecretProviderClass object, run the following command:

--> kubectl apply -f secretProviderClass.yaml

Example:-
root@ubuntuserver01:/home/admina# kubectl apply -f secretProviderClass.yaml

secretproviderclass.secrets-store.csi.x-k8s.io/rakaksvault2 created

deploy your Kubernetes pods with the SecretProviderClass and the secrets-store-creds that you configured earlier

create a file named  updateDeployment.yaml


# This is a sample pod definition for using SecretProviderClass and service-principal for authentication with Key Vault

kind: Pod
apiVersion: v1
metadata:
  name: nginx-secrets-store-inline
spec:
  containers:
  - image: nginx
    name: nginx
    volumeMounts:
    - name: secrets-store-inline
      mountPath: "/mnt/secrets-store"
      readOnly: true
  volumes:
    - name: secrets-store-inline
      csi:
        driver: secrets-store.csi.k8s.io
        readOnly: true
        volumeAttributes:
          secretProviderClass: "rakaksvault2"
        nodePublishSecretRef:                       # Only required when using service principal mode
          name: secrets-store-creds                 # Only required when using service principal mode

and copy the file to \home\admina folder in ubuntu server so that we can run the command

--> kubectl apply -f updateDeployment.yaml


root@ubuntuserver01:/home/admina# kubectl apply -f updateDeployment.yaml
pod/nginx-secrets-store-inline created
root@ubuntuserver01:/home/admina#

Check the pod status and secret content

To display the pods that you've deployed, run the following command:-

    kubectl get pods

root@ubuntuserver01:/home/admina# kubectl get pods

NAME                                                              READY   STATUS    RESTARTS   AGE

csi-secrets-store-provider-azure-1600924880-j8j9v                 1/1     Running   0          3d6h

csi-secrets-store-provider-azure-1600924880-secrets-store-4hzkx   3/3     Running   0          3d6h

hostname-v1-b797bf78-gcclq                                        1/1     Running   0          5d22h

hostname-v1-b797bf78-j9qzr                                        1/1     Running   0          5d22h

hostname-v1-b797bf78-vx44b                                        1/1     Running   0          5d22h

nginx-secrets-store-inline                                        1/1     Running   0          52m

root@ubuntuserver01:/home/admina#

To check the status of your pod, run the following command:

kubectl describe pod/nginx-secrets-store-inline


To display all the secrets that are contained in the pod, run the following command:

kubectl exec -it nginx-secrets-store-inline -- ls /mnt/secrets-store/


To display the contents of a specific secret, run the following command:-

kubectl exec -it nginx-secrets-store-inline -- cat /mnt/secrets-store/ExampleSecret


root@ubuntuserver01:/home/admina# kubectl exec -it nginx-secrets-store-inline -- cat /mnt/secrets-store/ExamplePassword

hVFkk965BuUv

root@ubuntuserver01:/home/admina#


Scaling pods and Nodes:-

Applications can be scaled in multiple ways, from manual to automatic at the POD level:

You can manually define the number of pods with:

kubectl scale --replicas=5 deployment/hostname-v1

root@ubuntuserver01:/home/admina# kubectl scale --replicas=5 deployment/hostname-v1

output:-

deployment.apps/hostname-v1 scaled


kubectl get pods

output:-
NAME                           READY   STATUS    RESTARTS   AGE
hostname-v1-5d7984db8b-2ssjn   1/1     Running   0           46s
hostname-v1-5d7984db8b-b4fxg   1/1     Running   0          13m
hostname-v1-5d7984db8b-lxn4g   1/1     Running   0           46s
hostname-v1-5d7984db8b-lzfz7   1/1     Running   0            46s
hostname-v1-5d7984db8b-p7nwq   1/1     Running   0         46s


Update the hostname deployment CPU requests and limits to the following:

Now we have from no-limit to limited 

updated hostname.yml
========================
apiVersion: apps/v1
kind: Deployment
metadata:
  name: hostname-v1
spec:
  replicas: 1
  selector:
    matchLabels:
      app: hostname
  strategy:
    rollingUpdate:
      maxSurge: 1
      maxUnavailable: 1
    type: RollingUpdate
  template:
    metadata:
      labels:
        app: hostname
        version: v1
    spec:
      containers:
      - image: rakakcourse28.azurecr.io/hostname:v1
        imagePullPolicy: Always
        name: hostname
        resources:
          requests:
             cpu: 250m
          limits:
             cpu: 500m
      restartPolicy: Always
---
apiVersion: v1
kind: Service
metadata:
  labels:
    app: hostname
  name: hostname
spec:
  ports:
  - nodePort: 31575
    port: 80
    protocol: TCP
    targetPort: 80
  selector:
    app: hostname
  sessionAffinity: None
  type: LoadBalancer


kubectl apply -f hostname.yml

Now scale your app with the following:

 kubectl autoscale deployment hostname-v1 --cpu-percent=50 --min=3 --max=10

You can see the status of your pods with:

kubectl get hpa
kubectl get pods

The manually set number of replicas (5) should reduce to 3 given there is minimal load on the app.

root@ubuntuserver01:/home/admina# kubectl get pods

NAME                         READY   STATUS    RESTARTS   AGE
hostname-v1-b797bf78-gcclq   1/1     Running   0          5m10s
hostname-v1-b797bf78-j9qzr   1/1     Running   0          3m52s
hostname-v1-b797bf78-vx44b   1/1     Running   0          3m52s


It is also possible to change the actual k8s cluster size. During cluster creation, you can set the cluster size with the flag:
--node-count

If we didn't enable cluster-autoscale, we could manually change the pool size after creation you can change the node pool size using:

az aks scale --resource-group RGP-USE-PLH-NP --name rakAKSCluster --node-count 3

The auto-scaling needs to be done at cluster create time, as it is not possible to enable autoscaling at the moment, or to change the min and max node counts on the fly (though we can manually change the node count in our cluster).

In order to trigger an autoscale, we can first remove the POD autoscaling hpa service:

kubectl delete hpa hostname-v1

Then we can scale our PODs (we set a max of 20 per node) to 25:

kubectl delete hpa hostname-v1

kubectl scale --replicas=25 deployment/hostname-v1

After a few minutes, we should see 25 pods running across at least two if not all three nodes in our autoscale group
 
kubectl get pods -o wide -w


How to Create the Azure Container Registry push a container to the registry and run the image from Azure Web App services

What is Azure Container Registry

Azure Container Registry is a service for storing and distributing and managing container images. 
Azure Container Registry is based on the open source Docker registry.
 You have unknowingly already used Docker registry in the form of Docker hub. 
 Docker hub is a public container registry as a service while Azure Container Registry is a private managed service provided by Microsoft providing similar functionality.
 
 You can think of the container registry as version control for container images. 
 A developer pushes container images to container registry and an administrator pulls those images from the registry.
 The container registry takes care of versioning of the images and helps manage the versions with tags.
 Container registry is a fundamental building block for enabling distribution of container images. 
 Rather than uploading container images to servers directly from a development environment,
 we often instrument our continuous deployment tools to pull images from container registry and place them on our servers. 
 Azure Container Registry comes with a set of features for security and high availability. 
 First, access to container registry can be controlled using Azure Active Directory and firewalls. 
 Second, repositories can be replicated across Azure data center regions.
 And third, images can be signed using Docker Content Trust.
 Instead of building the container images at the developer machine,
 you can use Azure Container Registry to run Docker build commands in the cloud.
 Azure Container Registry will then take the Dockerfile and the build context. 
 It doesn't need input. Build it into a container image and finally publish it to the registry.
 Azure Container Registry supports automatically triggered tasks as well. 
 The tasks can be scheduled or based on some outside metrics such as changes in source code. 
 For example, Azure Container Registry can be configured to rebuild the application image when an update to the base image it uses is available on Docker hub.
 
Testing env OS: Ubuntu 18.4  which have Docker Engine installed using link


Install Azure CLI on Linux manually using below link

curl -sL https://aka.ms/InstallAzureCLIDeb | sudo bash

Here we will learn below:-

1.How to build an docker image locally
2.Create the Azure Container Registry
3. Push a container to the Registry
4.Verify container registry images and check tagging has been done correctly
5. Run the image locally to verify operation
6. Run the image from Azure Web App Services.
7. stop and clean the local container which is in Azure container registry
8.Secure Access to ACR

1.How to build an docker image locally

  you can quickly build your own mini-application image (see the app_example folder  file):

https://drive.google.com/drive/folders/1oEQMbAPriXm__yjkA9mzlG8_wQi_H_Ll?usp=sharing

copy folder  app_example to azuser folder>> winscp and paste into \home\azuser folder

go to app_example folder and run chmod 777 hostname.sh

Build the image
-->docker build app_example/ -t hostname:v1

1.Create the Azure Container Registry


Azure Container Registry (ACR) is an Azure-based private registry for Docker container images.
Lets create an ACR instance to store our application in, and upload our container app to the newly created registry.

First you'll need to create a resource group, which we will re-use for the rest of the course:

---> az group create --name RGP-USE-PLH-NP --location eastus

Now  we can create an ACR instance:

-->az acr create --resource-group RGP-USE-PLH-NP --name rakakcourse28 --sku Basic

Login to your ACR instance:
--->az acr login --name rakakcourse28


Verify that you have a local copy of your application image:
-->docker images

We need to tag the image with the registry login server address

 which we can get with:

1. Need to retrieve the azure container registry name

-->az acr list --resource-group RGP-USE-PLH-NP --query "[].{acrLoginServer:loginServer}" --output tsv

-->export aLS=rakakcourse28.azurecr.io
Tag your nginx image with the server address and verion (v1 in this case):
-->docker tag hostname:v1 ${aLS}/hostname:v1

Verify that your tags have been applied:
-->docker images

2.Push the image to the Registry

Push the image to the Registry:

-->docker push ${aLS}/hostname:v1

3.Verify container registry images


Verify that the image has been pushed correctly:
-->az acr repository list --name rakakcourse28 --output tsv

You can verify that the image is appropriately tagged with (repository is the output of the previous step):

-->repository=hostname
-->az acr repository show-tags --name rakakcourse28 --repository ${repository} --output tsv

Once we've pushed an image to the Azure Registry, we should verify that we can download and run the image. 
First, we should still have a tagged version in our local images repository:

docker images | grep hostname

output:-
root@ubuntutest2020:/home/admina# docker images | grep hostname

hostname                                               v1                  3bc64b3156f8        11 minutes ago      133MB
rakakcourse28.azurecr.io/hostname   v1                  3bc64b3156f8        11 minutes ago      133MB


The longer name version (as there may be multiple tags) is the one that's also associated with the Azure Registry that we created previously . In order to verify that we can pull from the registry, we'll first remove the image, and then pull the image down from the registry (replacing <registry/image:version> with the registry tagged name from the previous command):

docker rmi rakakcourse28.azurecr.io/hostname:v1

docker rmi hostname:v1

azuser@ubuntutest2020:~$ docker rmi hostname:v1
Untagged: hostname:v1
Deleted: sha256:432556f47963403bf510b99ece271ffc64c5cf747a9cea5ce535efd2ef76fae2
Deleted: sha256:b47388279d060843dc1416f70cc9c19462c8c2f5a405e7e86361ea981844cfca
Deleted: sha256:0b9a846c3d3639a1f7c560f79f5a55eda45b011e23df42bdb032bf8e404794e1
Deleted: sha256:91e0b1ab1e8666140675d2326187ea88bbb23017be290f71f7f8ab680bee895a
Deleted: sha256:ec72d77541f91820348577c4828b801f3f426d875d0b695828d98e97c91c8d5f

~~~~~~~~~~~~~~~~~~~~~~~~~~~~~~~~~~~~~~~~~
but still we have ngnix image
azuser@ubuntutest2020:~$ docker images
REPOSITORY                                      TAG                 IMAGE ID            CREATED             SIZE
nginx                                           latest              8cf1bfb43ff5        11 days ago         132MB
rakcontainerregistry26.azurecr.io/hello-world   v1                  bf756fb1ae65        7 months ago        13.3kB

azuser@ubuntutest2020:~$


azuser@ubuntutest2020:~$ docker pull rakakcourse28.azurecr.io/hostname:v1
v1: Pulling from hostname
6ec8c9369e08: Already exists
d3cb09a117e5: Already exists
7ef2f1459687: Already exists
e4d1bf8c9482: Already exists
795301d236d7: Already exists
9a9f2fd6787e: Pull complete
Digest: sha256:b258c1f4ca03ab3a7b84dec905b3e52c7527e58b384b005d5d9e152a96950047
Status: Downloaded newer image for rakakcourse28.azurecr.io/hostname:v1
rakakcourse28.azurecr.io/hostname:v1
azuser@ubuntutest2020:~$

4. Run the image locally to verify operation


It should also then be possible to run the image locally to verify operation:

docker run --rm --name hostname -p 8080:80 -d <registry/image:version>

docker run --rm --name hostname -p 8080:80 -d rakakcourse28.azurecr.io/hostname:v1

-d == demonized version


azuser@ubuntutest2020:~$ curl localhost:8080

<HTML>
<HEAD>
<TITLE>This page is on 25f9e680142a and is version v1</TITLE>
</HEAD><BODY>
<H1>THIS IS HOST 25f9e680142a</H1>
<H2>And we're running version: v1</H2>
</BODY>
</HTML>
azuser@ubuntutest2020:~$

5. Run the image from Azure Web App Services.


Login to Azure Portal 


click on URL  --> https://dockerimage.azurewebsites.net


stop and clean the local container which is in Azure container registry

now Stop the running container
-->docker stop hostname


   Remove image rakakcourse28.azurecr.io/hostname:v1
-->docker rmi rakakcourse28.azurecr.io/hostname:v1

Secure Access to ACR


Thanks for Reading..

How to domain join through MOF and Azure Automation account - DSC

Create a PowerShell File with name DomainJoinConfiguration.ps1

PS C:\Users\admina> Install-packageProvider -name Nuget

PS C:\Users\admina> Install-Module -Name xPSDesiredStateConfiguration -Force

PS C:\Users\admina>Install-Module -Name xDSCDomainjoin  -Force


Configuration DomainJoinConfiguration

param(
    [PSCredential]$DomainCredential
)
    Import-DscResource -ModuleName 'xDSCDomainjoin'
       
    node $AllNodes.NodeName 
    {
        xDSCDomainjoin JoinDomain
        {
            Domain = 'adven.com'
            Credential = $DomainCredential
         
        }
    }
}

$ConfigData = @{
    AllNodes = @(
        @{
            NodeName = "*"
            PSDscAllowPlainTextPassword = $True
            PSDscAllowDomainUser = $true
         
        }
        @{
            NodeName = "localhost"
        }
    )

~~~~~~~~~~~~~~~~~~~~~~~~~~~~~~~~~~~~~~~~~~~~
 C:\xfer\DomainJoinConfiguration.ps1

Then execute below command

$cred = Get-Credential -UserName kushagra@adven.com -Message "Password please"
DomainJoinConfiguration -DomainCredential $cred -ConfigurationData $ConfigData

Then

PS C:\Users\admina> DomainJoinConfiguration -DomainCredential $cred -ConfigurationData $ConfigData


    Directory: C:\Users\admina\DomainJoinConfiguration


Mode                LastWriteTime         Length Name                                                                             
----                -------------         ------ ----                                                                             
-a----         7/5/2020   7:31 PM           2220 iisserver01.mof                                                                   


PS C:\Users\admina> Start-DscConfiguration -Path C:\Users\admina\DomainJoinConfiguration -Force -Wait -Verbose


You will observe The VM is joined to Domain.


Through Azure Automation
~~~~~~~~~~~~~~~~~~~~~~
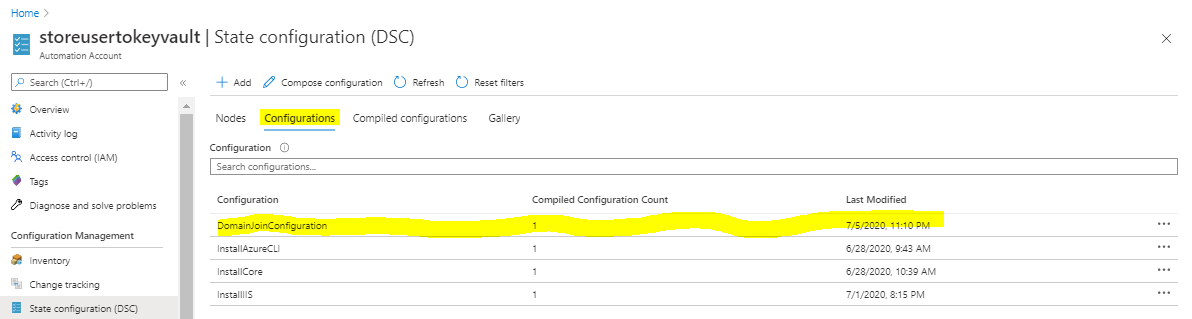
Create a Powershell file with name DomainJoinConfiguration

In Azure Automation account ensure xDSCDomainjoin is added in the module.

Configuration DomainJoinConfiguration
{   
    Import-DscResource -ModuleName 'xDSCDomainjoin'
   
    #domain credentials to be given here   
    $secdomainpasswd = ConvertTo-SecureString "lXXitech@XXX" -AsPlainText -Force
    $mydomaincreds = New-Object System.Management.Automation.PSCredential("l1user01@adven.com"$secdomainpasswd)
          
    node $AllNodes.NodeName   
    {
        xDSCDomainjoin JoinDomain
        {
            Domain = 'adven.com'
            Credential = $mydomaincreds
           
        }
    }
}

save the file as DomainJoinConfiguration.ps1
upload the file to Azure Automation account


from local laptop
Connect-AzureRmAccount -Tenant "8896b7ee-113f-XXXX-8fe2-05XXXXXccbcf01" -SubscriptionId "9239f519-XX04-XXXX-ae6f-c84XXXXX714" $ConfigData = @{ AllNodes = @( @{ NodeName = "*" PSDscAllowPlainTextPassword = $True PSDscAllowDomainUser = $true } @{ NodeName = "DomainJoined" } ) } $compilationJob = Start-AzureRmAutomationDscCompilationJob -ResourceGroupName 'NetworkWatcherRG' -AutomationAccountName 'storeusertokeyvault' -ConfigurationName 'DomainJoinConfiguration' -ConfigurationData $ConfigData $compilationJob


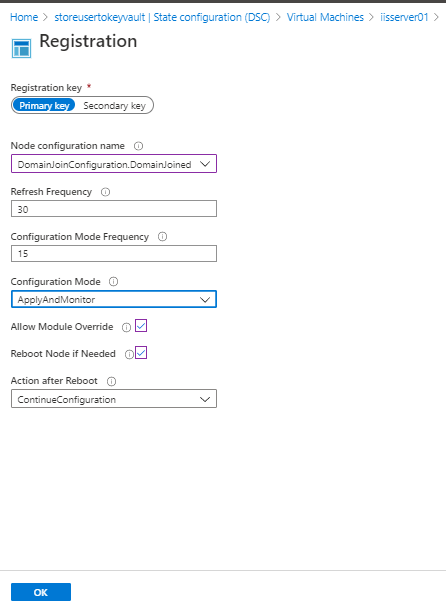
Press okay, you will observe selected VM is joined to domain.


Associate KeyVault Certificate to Application Gateway for TLS Termination in Azure


#Creates or updates the policy for a certificate in a key vault.

$Policy = New-AzKeyVaultCertificatePolicy -SecretContentType "application/x-pkcs12" -SubjectName "CN=adven.com" -IssuerName "Self" -ValidityInMonths 6 -ReuseKeyOnRenewal

#Adds a certificate to a key vault.
 #Here TestCert01 is Certificate Name and hpvault01 is keyVault Name in  
Add-AzKeyVaultCertificate -VaultName "hpvault01" -Name "TestCert01" -CertificatePolicy $Policy

Gets the status of a certificate operation. Check the progress until its status is complete
$progress=(Get-AzKeyVaultCertificateOperation -VaultName "hpvault01" -name TestCert01).status
Gets the secrets in a key vault.
$cert=Get-AzkeyvaultSecret -VaultName "hpvault01" -Name "TestCert01"

#Converts the specified string, which encodes binary data as base-64 digits, to an equivalent 8-bit unsigned integer array

$certBytes=[System.Convert]::FromBase64String($cert.SecretValueText)

# Write all Bytes to local computer C:\xfer Folder
[System.IO.File]::WriteAllBytes("C:\xfer\TestCert01",$certBytes)

$certCollection = New-Object System.Security.Cryptography.X509Certificates.X509Certificate2Collection

$certCollection.Import($certBytes,$null,[System.Security.Cryptography.X509Certificates.X509KeyStorageFlags]::Exportable)

$certificateBytes = $certCollection.Export([System.Security.Cryptography.X509Certificates.X509ContentType]::Cert)

$name = $cert.Name
$cerName = $name.Replace('pfx','cer')

[System.IO.File]::WriteAllBytes("C:\xfer\$cerName", $certificateBytes)
Write-Host "Certificate created from Pfx and copied to local directory C:\xfer folder

Create an Application gateway using portal

Create a Managed identity using AZ CLI
--------------------------------------

$rgname = "newrakeshrg"
$location = "East US"
$kv = "hpvault01"
$appgwName = "prestigeappgateway"

$resourceGroup = New-AzResourceGroup -Name $rgname -Location $location
$identity = New-AzUserAssignedIdentity -Name "appgwKeyVaultIdentity" `
  -Location $location -ResourceGroupName $rgname

# Now associate the keyvault Certificate to Application gateway listener using portal


How to create a DSC File for Azure data Studio

launch powershell ISE in Administrator mode
save the file as InstallAzureDataStudio.ps1
if your  VM does not have PSDesiredStateConfiguration module installed

Go to Powershell console and execute below command

 PS C:\Users\admina> [Net.ServicePointManager]::SecurityProtocol = [Net.SecurityProtocolType]::Tls12

PS C:\Users\admina> Install-packageProvider -name Nuget

PS C:\Users\admina> Install-Module -Name xPSDesiredStateConfiguration -Force

PS C:\Users\admina>

go to the File "InstallAzureDataStudio.ps1"
 and execute this File, this DSC will create a Folder name xfer in C:\ drive.


 Configuration InstallAzureDataStudio
{
   Import-DscResource -ModuleName PSDesiredStateConfiguration
   #Import-DscResource -ModuleName xPSDesiredStateConfiguration

File SetupDir
 {
   Type = 'File'
   SourcePath = "C:\Users\admina\Downloads\azuredatastudio-windows-setup-1.17.0.exe" #This path should exists
   DestinationPath = 'C:\xfer\'
   Ensure = "Present"
  }

  Log AfterFileCopy
        {
            # The message below gets written to the Microsoft-Windows-Desired State Configuration/Analytic log
            Message = "Finished copying file to C:\xfer........ "
            DependsOn = "[File]SetupDir" # Depends on successful execution of the File resource.
        }
     

Package AzureDataStudioPackage
 {
  Ensure = "Present"
  Name = "Azure Data Studio"
  Path= "C:\xfer\azuredatastudio-windows-setup-1.17.0.exe"
  ProductId = ""
  Arguments = "/VERYSILENT"
  }
 
}


InstallAzureDataStudio


First Command
------------------------------
PS C:\Users\admina> C:\xfer\InstallAzureDataStudio.ps1


    Directory: C:\Users\admina>InstallAzureDataStudio


Mode                LastWriteTime         Length Name                                                                             
----                -------------         ------ ----                                                                             
-a----        4/30/2020   6:46 AM           3060 localhost.mof


it has created .mof file in C:\Users\admina

Second Command
------------------------------
PS C:\Users\admina> Start-DscConfiguration -Path "C:\Users\admina\InstallAzureDataStudio\InstallAzureDataStudio" -Force -Wait -Verbose

output:-

VERBOSE: Perform operation 'Invoke CimMethod' with following parameters, ''methodName' = SendConfigurationApply,'className' = MSFT_DSC
LocalConfigurationManager,'namespaceName' = root/Microsoft/Windows/DesiredStateConfiguration'.
VERBOSE: An LCM method call arrived from computer rak-desc-test with user sid S-1-5-21-271070641-441374908-1635702522-500.
VERBOSE: [rak-desc-test]: LCM:  [ Start  Set      ]
VERBOSE: [rak-desc-test]: LCM:  [ Start  Resource ]  [[File]SetupDir]
VERBOSE: [rak-desc-test]: LCM:  [ Start  Test     ]  [[File]SetupDir]
VERBOSE: [rak-desc-test]:                            [[File]SetupDir] The destination object was found and no action is required.
VERBOSE: [rak-desc-test]: LCM:  [ End    Test     ]  [[File]SetupDir]  in 0.0160 seconds.
VERBOSE: [rak-desc-test]: LCM:  [ Skip   Set      ]  [[File]SetupDir]
VERBOSE: [rak-desc-test]: LCM:  [ End    Resource ]  [[File]SetupDir]
VERBOSE: [rak-desc-test]: LCM:  [ Start  Resource ]  [[Package]AzureDataStudioPackage]
VERBOSE: [rak-desc-test]: LCM:  [ Start  Test     ]  [[Package]AzureDataStudioPackage]
VERBOSE: [rak-desc-test]:                            [[Package]AzureDataStudioPackage] Validate-StandardArguments, Path was C:\setup\a
zuredatastudio-windows-setup-1.17.0.exe
VERBOSE: [rak-desc-test]:                            [[Package]AzureDataStudioPackage] The path extension was .exe
VERBOSE: [rak-desc-test]:                            [[Package]AzureDataStudioPackage] Ensure is Present
VERBOSE: [rak-desc-test]:                            [[Package]AzureDataStudioPackage] product installation cannot be determined
VERBOSE: [rak-desc-test]:                            [[Package]AzureDataStudioPackage] product as boolean is False
VERBOSE: [rak-desc-test]:                            [[Package]AzureDataStudioPackage] The package Azure Data Studio is not installed
VERBOSE: [rak-desc-test]: LCM:  [ End    Test     ]  [[Package]AzureDataStudioPackage]  in 0.0150 seconds.
VERBOSE: [rak-desc-test]: LCM:  [ Start  Set      ]  [[Package]AzureDataStudioPackage]
VERBOSE: [rak-desc-test]:                            [[Package]AzureDataStudioPackage] Validate-StandardArguments, Path was C:\setup\a
zuredatastudio-windows-setup-1.17.0.exe
VERBOSE: [rak-desc-test]:                            [[Package]AzureDataStudioPackage] The path extension was .exe
VERBOSE: [rak-desc-test]:                            [[Package]AzureDataStudioPackage] Ensure is Present
VERBOSE: [rak-desc-test]:                            [[Package]AzureDataStudioPackage] product installation cannot be determined
VERBOSE: [rak-desc-test]:                            [[Package]AzureDataStudioPackage] product as boolean is False
VERBOSE: [rak-desc-test]:                            [[Package]AzureDataStudioPackage] The package Azure Data Studio is not installed
VERBOSE: [rak-desc-test]:                            [[Package]AzureDataStudioPackage] Validate-StandardArguments, Path was C:\setup\a
zuredatastudio-windows-setup-1.17.0.exe
VERBOSE: [rak-desc-test]:                            [[Package]AzureDataStudioPackage] The path extension was .exe
VERBOSE: [rak-desc-test]:                            [[Package]AzureDataStudioPackage] Package configuration starting
VERBOSE: [rak-desc-test]:                            [[Package]AzureDataStudioPackage] The binary is an EXE
VERBOSE: [rak-desc-test]:                            [[Package]AzureDataStudioPackage] Starting C:\setup\azuredatastudio-windows-setup
-1.17.0.exe with /VERYSILENT
VERBOSE: [rak-desc-test]:                            [[Package]AzureDataStudioPackage] Starting process C:\setup\azuredatastudio-windo
ws-setup-1.17.0.exe with arguments /VERYSILENT
VERBOSE: [rak-desc-test]:                            [[Package]AzureDataStudioPackage] The machine requires a reboot
VERBOSE: [rak-desc-test]:                            [[Package]AzureDataStudioPackage] Package has been installed
VERBOSE: [rak-desc-test]:                            [[Package]AzureDataStudioPackage] Package configuration finished
VERBOSE: [rak-desc-test]: LCM:  [ End    Set      ]  [[Package]AzureDataStudioPackage]  in 23.9840 seconds.
VERBOSE: [rak-desc-test]: LCM:  [ End    Resource ]  [[Package]AzureDataStudioPackage]
VERBOSE: [rak-desc-test]:                            [] A reboot is required to progress further. Please reboot the system.
WARNING: [rak-desc-test]:                            [] A reboot is required to progress further. Please reboot the system.
VERBOSE: [rak-desc-test]: LCM:  [ End    Set      ]
VERBOSE: [rak-desc-test]: LCM:  [ End    Set      ]    in  24.1710 seconds.
VERBOSE: Operation 'Invoke CimMethod' complete.
VERBOSE: Time taken for configuration job to complete is 25.696 seconds

PS C:\Users\admina>

you will observe Azure data studio has successfully been installed and you will find the same in control panel.

Go to C:\Program Files\Azure Data Studio and launch azuredatastudio.exe


Thanks for Reading..

How to Fix the issue when you try to install a module xPDesiredStateConfiguration and it gets fail with below error..

How to Fix the issue when you try to install a module xPDesiredStateConfiguration and it gets fail with below error..

PackageManagement\Install-PackageProvider : No match was found for the specified search criteria for the provider
'NuGet'. The package provider requires 'PackageManagement' and 'Provider' tags. Please check if the specified
package has the tags.
At C:\Program Files\WindowsPowerShell\Modules\PowerShellGet\1.0.0.1\PSModule.psm1:7405 char:21
+ ...     $null = PackageManagement\Install-PackageProvider -Name $script:N ...


PS C:\Users\admina> Install-Module -Name xPDesiredStateConfiguration
WARNING: Unable to download from URI 'https://go.microsoft.com/fwlink/?LinkID=627338&clcid=0x409' to ''.
WARNING: Unable to download the list of available providers. Check your internet connection.
PackageManagement\Install-PackageProvider : No match was found for the specified search criteria for the provider
'NuGet'. The package provider requires 'PackageManagement' and 'Provider' tags. Please check if the specified
package has the tags.
At C:\Program Files\WindowsPowerShell\Modules\PowerShellGet\1.0.0.1\PSModule.psm1:7405 char:21
+ ...     $null = PackageManagement\Install-PackageProvider -Name $script:N ...
+                 ~~~~~~~~~~~~~~~~~~~~~~~~~~~~~~~~~~~~~~~~~~~~~~~~~~~~~~~~~
    + CategoryInfo          : InvalidArgument: (Microsoft.Power...PackageProvider:InstallPackageProvider) [Install-P
   ackageProvider], Exception
    + FullyQualifiedErrorId : NoMatchFoundForProvider,Microsoft.PowerShell.PackageManagement.Cmdlets.InstallPackageP
   rovider

PackageManagement\Import-PackageProvider : No match was found for the specified search criteria and provider name
'NuGet'. Try 'Get-PackageProvider -ListAvailable' to see if the provider exists on the system.
At C:\Program Files\WindowsPowerShell\Modules\PowerShellGet\1.0.0.1\PSModule.psm1:7411 char:21
+ ...     $null = PackageManagement\Import-PackageProvider -Name $script:Nu ...
+                 ~~~~~~~~~~~~~~~~~~~~~~~~~~~~~~~~~~~~~~~~~~~~~~~~~~~~~~~~~
    + CategoryInfo          : InvalidData: (NuGet:String) [Import-PackageProvider], Exception
    + FullyQualifiedErrorId : NoMatchFoundForCriteria,Microsoft.PowerShell.PackageManagement.Cmdlets.ImportPackagePr
   ovider

WARNING: Unable to download from URI 'https://go.microsoft.com/fwlink/?LinkID=627338&clcid=0x409' to ''.
WARNING: Unable to download the list of available providers. Check your internet connection.
PackageManagement\Get-PackageProvider : Unable to find package provider 'NuGet'. It may not be imported yet. Try
'Get-PackageProvider -ListAvailable'.
At C:\Program Files\WindowsPowerShell\Modules\PowerShellGet\1.0.0.1\PSModule.psm1:7415 char:30
+ ... tProvider = PackageManagement\Get-PackageProvider -Name $script:NuGet ...
+                 ~~~~~~~~~~~~~~~~~~~~~~~~~~~~~~~~~~~~~~~~~~~~~~~~~~~~~~~~~
    + CategoryInfo          : ObjectNotFound: (Microsoft.Power...PackageProvider:GetPackageProvider) [Get-PackagePro
   vider], Exception
    + FullyQualifiedErrorId : UnknownProviderFromActivatedList,Microsoft.PowerShell.PackageManagement.Cmdlets.GetPac
   kageProvider

Install-Module : NuGet provider is required to interact with NuGet-based repositories. Please ensure that
'2.8.5.201' or newer version of NuGet provider is installed.
At line:1 char:1
+ Install-Module -Name XPDesiredStateConfiguration
+ ~~~~~~~~~~~~~~~~~~~~~~~~~~~~~~~~~~~~~~~~~~~~~~~~
    + CategoryInfo          : InvalidOperation: (:) [Install-Module], InvalidOperationException
    + FullyQualifiedErrorId : CouldNotInstallNuGetProvider,Install-Module


PS C:\Users\admina>

Resolution :-


in order to fix this issue

PS C:\Users\admina> [Net.ServicePointManager]::SecurityProtocol = [Net.SecurityProtocolType]::Tls12

PS C:\Users\admina> Install-packageProvider -name Nuget

PS C:\Users\admina> Install-Module -Name xPSDesiredStateConfiguration -Force

PS C:\Users\admina>


Generate an Azure Application Gateway self-signed certificate with a custom root CA


https://slproweb.com/products/Win32OpenSSL.html

  download 32 bit.
then follow below link:-
https://docs.microsoft.com/bs-latn-ba/azure/application-gateway/self-signed-certificates

at section Generate the certificate with the CSR and the key and sign it with the CA’s root key

 instead of

openssl x509 -req -in fabrikam.csr -CA public.crt -CAkey contoso.key -CAcreateserial -out fabrikam.crt -days 365 -sha256

 use this
openssl x509 -req -in fabrikam.csr -CA contoso.crt -CAkey contoso.key -CAcreateserial -out fabrikam.crt -days 365 -sha256

then use below to merge fabrikam.key + fabrikam.crt to fabrikam.pfx

Refer blog

https://www.ssl.com/how-to/create-a-pfx-p12-certificate-file-using-openssl/

command:-
openssl pkcs12 -export -out fabrikam.pfx -inkey fabrikam.key -in fabrikam.crt

and

openssl pkcs12 -export -out contoso.pfx -inkey contoso.key -in contoso.crt


then continue with
https://docs.microsoft.com/bs-latn-ba/azure/application-gateway/self-signed-certificates
~~~~~~~~~~~~~~~~~~~~~~~~~~~~~~~~~~~~~~~~~~~~~~~~~~~~~~~~~~~~~~~~~~~~~

openssl ecparam -out rakeshca.key -name prime256v1 -genkey

openssl req -new -sha256 -key rakeshca.key -out rakeshca.csr

openssl x509 -req -sha256 -days 365 -in rakeshca.csr -signkey rakeshca.key -out rakeshca.crt


~~~~~ server certificate  named rakeshdevops.com issuer is  rakeshca~~~~~~~~~~~


openssl ecparam -out rakeshdevops.key -name prime256v1 -genkey

openssl req -new -sha256 -key rakeshdevops.key -out rakeshdevops.csr

openssl x509 -req -in rakeshdevops.csr -CA  rakeshca.crt -CAkey rakeshca.key -CAcreateserial -out rakeshdevops.crt -days 365 -sha256

openssl x509 -in rakeshdevops.crt -text -noout


Export:-

openssl pkcs12 -export -out rakeshdevops.pfx -inkey rakeshdevops.key -in rakeshdevops.crt


~~~~~other server certificate  named punamdevops.com issuer is  ~~~~~~~~~~~~~~~~~rakeshca~~~~~~~~~~~~~~~~~~~~~~~~~~~~~~~~~~~~~~~~~~~~~~~~~~~


openssl ecparam -out punamdevops.key -name prime256v1 -genkey

openssl req -new -sha256 -key punamdevops.key -out punamdevops.csr

openssl x509 -req -in punamdevops.csr -CA  rakeshca.crt -CAkey rakeshca.key -CAcreateserial -out punamdevops.crt -days 365 -sha256

openssl x509 -in punamdevops.crt -text -noout


 Export:-

openssl pkcs12 -export -out punamdevops.pfx -inkey punamdevops.key -in punamdevops.crt


openssl pkcs12 -export -out rakeshca.pfx -inkey rakeshca.key -in rakeshca.crt


openssl s_client -connect localhost:443 -servername www.rakeshdevops.com -showcerts